How to Fix Zoom Error Code 1132?
Zoom has had a surge in usage since the start of this year as people started working from their homes. The application gained its popularity due to its video conferencing features that allowed people to work from home. One of the issues people face while using the Zoom application on their desktop is the error code 1132. The error code is accompanied by the error message “An unknown error occurred“. This error message appears when users try to join a meeting through their Zoom application.

As it turns out, the error dialog box includes a try on a browser button that lets them join the meeting on the browser. In some cases, users are not even able to join the meeting on their browser. One of the reasons that the issue may occur is due to the blacklisting of the Zoom platform. We will be discussing the causes of the said issue in more detail down below. So, without further ado, let us get started.
- Zoom blacklist — This has to be the primary cause of the issue. In some cases, the error code occurs when your account is blacklisted by the Zoom platform for violating their service terms. However, if you are able to join meetings from your account on the website, then that indicates that the issue is not with your account.
- Windows Firewall — Another reason that the error code may appear is due to the Windows Firewall. In some cases, the Zoom app isn’t able to establish a connection through the specified protocol and thus the issue occurs. In such a scenario, you will simply have to change the protocol type of the Zoom rules in Windows Firewall settings.
- Outdated Zoom application — Finally, as it turns out the issue can also be triggered by an outdated Zoom installation. The issue was caused for several users due to a bug. Therefore, if you have an obsolete installation, that may be the culprit.
Now that we have gone through the possible causes of the issue, we will go through the different methods that you can use to have the issue resolved. Let’s get started.
Method 1: Update Zoom
The first thing that you should when you get the error message is to make sure that your Zoom installation is up to date. As we have mentioned above, the issue was caused by a bug in a build of the desktop app which prevented users from joining a meeting. Therefore, you will have to simply update your application and see if that resolves the issue. To do this, follow the instructions down below:
- First of all, open up the Zoom desktop application and sign in to your account.
- Once you have signed in, click on your profile picture and then click on the Check for Updates option from the drop-down menu.

Checking for Zoom Updates - In case there’s an update available, Zoom will download the update and then install it on your system.
- Wait for the process to complete and then try joining a meet to see if the issue has been resolved.
Method 2: Create New Windows Account
In case your application is already up to update or the update does not resolve the issue, you can simply create a new Windows user account and then try using the application from that. This has worked out for almost every other user who faced this issue and it should most likely work out for you. In addition to that, we will include a neat trick that will let you run the application as a different user from your original user account. This means that you won’t have to switch to a different user account every time you wish to use the desktop application. To do this, follow the instructions down below:
- First of all, you will have to uninstall Zoom completely from your current user account. To do this, open up the Start Menu.
- In the Start Menu, search for the Control Panel and then open it up.
- On the Control Panel, click on the Uninstall a program option under Programs and features.

Control Panel - That will bring up a list of the installed applications on your system. From the list, double-click on Zoom and then follow through the prompts to remove Zoom from your system.
- Once you have done that, you will have to create a new user account. To do this, open up the Control Panel again and click on the “Change account type” option under User Accounts.
- Then, click on the Add a new user in PC Settings option. This will open up the Settings window.

User Accounts - Click on the Add someone else to this PC option and then follow through the prompts to add a new user account.

Windows User Settings - Once you have created a new user account, restart your system. When your system boots up, login into the new user account and download the Zoom desktop client from their official website.
- Install the application and then sign into your account. See if that resolves the issue.
- In case the issue is resolved, create a new text document file and open it up.
- Paste the following into the text document:
runas /user:USERNAME “PathToZoom” UserPassword
- Make sure to replace USERNAME and UserPassword with the credentials of the new user account. Also provide the path to the Zoom.exe file in place of PathToZoom.
- After that, save the file as a .bat file. Once you have done that, you can execute this batch script to run the Zoom application as a different user from your original user account. This will save you from the effort of changing the user account.
Method 3: Change Windows Firewall Settings
As it turns out, in some scenarios the issue can also be caused due to your Windows Firewall settings which is blocking it from establishing a connection successfully. In such a case, you can easily resolve this by changing the firewall settings for Zoom. To do this, follow the instructions down below:
- First of all, open up the Start Menu and search for the Windows Defender Firewall.
- Open it up and then click on the Advanced settings option on the left-hand side.

Windows Defender Firewall - On the new window that appears, click on the Inbound Rules option.
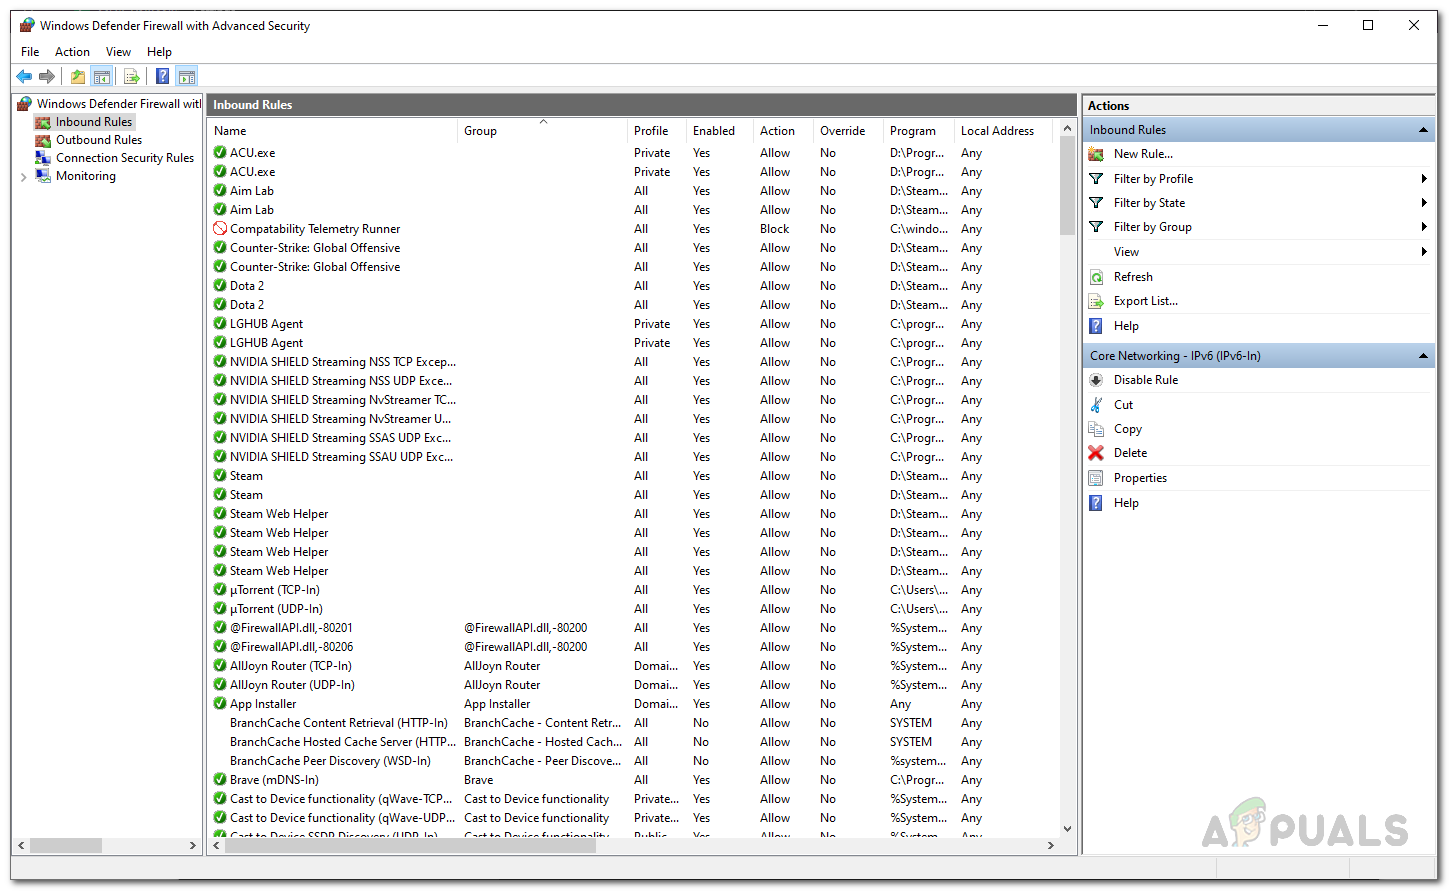
Windows Firewall Inbound Rules - From the list of rules, double-click on each Zoom rule and switch to the Protocols and Ports tab.
- There, change the Protocol type to Any.

Firewall Rule Settings - Once you have done that, click on Apply and then hit OK.
- Close Zoom and then open it up again. See if that resolves the issue.